

How To Register My Phone On Network
There are several reasons why your Samsung Galaxy device might give yous a "Not registered on network" error. It could be considering your device entered airplane way and failed to connect with the cellular tower.
Information technology could as well be because your SIM card is incorrectly inserted or there is a hardware issue with the device.
Whatever the reason, this guide will help you fix the fault and go dorsum on the network in no fourth dimension. All the issues with the "non registered on a network" error will be gone.
If your telephone shows the "No Service" Error, Read:Why does my phone says no service? If it shows the "No Sim Card" Mistake, Read No SIM bill of fare error on Android.
If it shows the "Mobile Network not Bachelor" Error, Read Mobile Network not Available mistake on Android.
The Reason Why You Are Receiving The "Not Registered on Network" Error
If y'all observe the "not registered on network" error on your Samsung Galaxy or Android telephone , it may be because the software is non updated, and your phone is running the earlier version of this software. "Not Registered On Network" error is a standard Android problem that occurs on T-Mobile , Vodafone , AT&T , Airtel , and Rogers even subsequently rooting your device.
As well, when your phone is locked to a carrier, it may display such an error. Unlocking your phone might help.
How To Fix The "Not Registered On Network" Error on Your Android Phone
Bones Troubleshoots
- Ensure you have an active and valid mobile information programme with your current carrier and your reception is strong.
- Ensure that the Aeroplane way is OFF. Sometimes, we accidentally enable this feature. Open Settings > Connections > Airplane mode. Toggle the switch button.
- Reinsert your SIM carte, check for damages and make sure it is inserted correctly. If y'all take another phone around, place your SIM card in information technology and attempt to make a telephone call.
- Restart your phone.
Quick Check
Perhaps you lot accidentally enabled the Aeroplane mode on your phone, disabled Mobile data, etc. Therefore, earlier nosotros go further, do these quick troubleshoots.
- Brand certain the Airplane mode is disabled. You can also toggle the Airplane mode on and off
- Toggle Mobile Data
Method 1 - Software Update
Make sure you are connected to a Wi-Fi network.
Software Update on newer devices
From your habitation screen, select :
- Settings
- Navigate to Arrangement updates
- Check for system updates
Software Update on older devices
- Navigate to Settings
- Ringlet down to the extreme bottom
- Select Software Update
- Please wait for it to reboot and consummate the update
- Finished!
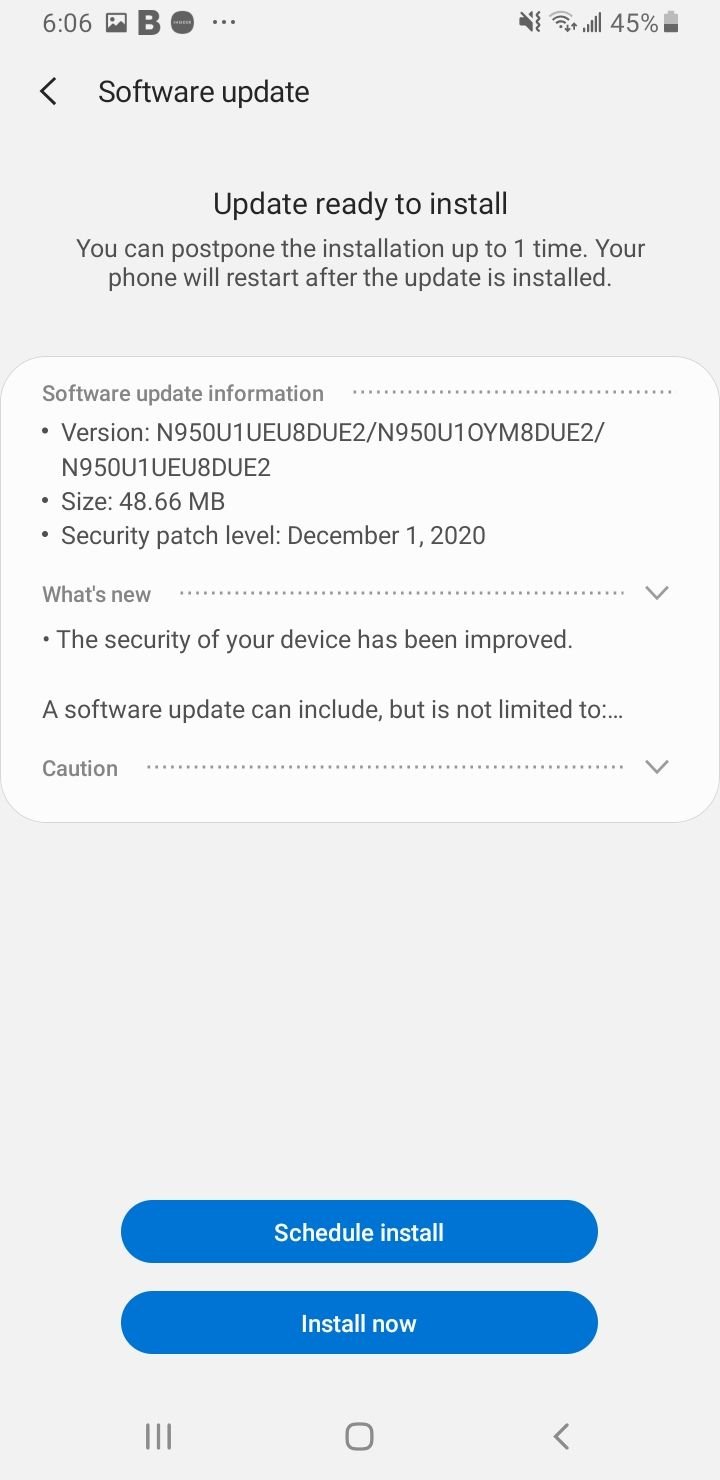
If your device finds a new update, tap Download at present. When it is finished downloading, a new screen will appear alerting you that the software version is fix to be installed.
If the method above didn't work for yous, I recommend reading Restore Milky way Nil IMEI # and Ready Not Registered on Network.
Method two - Rebooting and Reinserting
If this method does non work at first, endeavour doing it again. Follow these steps:
- Turn off your phone by belongings the Ability Button and the Abode (Or Volume Down Push button) in conjunction.
- While the phone is off, expect for 2 minutes.
- After 2 minutes, remove the battery (Only if your phone battery tin be removed) and the SIM menu from the phone.
- Press the Power button and the home(Or Book Down) button together ten consecutive times.
- Afterward, hold the power and home (Or Book Down) keys for 1-iii minutes.
- Adjacent, insert your SIM card and the bombardment (Merely if your phone battery can be removed)
- Turn on your phone.
- While your phone is on, remove your SIM carte and so reinsert information technology. Repeat this five times. (On some android phones, you need to remove the battery before taking out the sim carte du jour. If this is this issue, please skip this step)
- A message will appear saying that you lot need to "Restart your Telephone"- click it.
- Finally, your Android phone should boot up with no errors.
Method 3 - The SIM Menu
If the methods to a higher place didn't work, then the problem lies with your SIM Card.
Kickoff, try to reinsert the card. Open the SIM tray, take the SIM carte and check it out. Make sure it is not damaged. If it is, contact your carrier for a replacement.
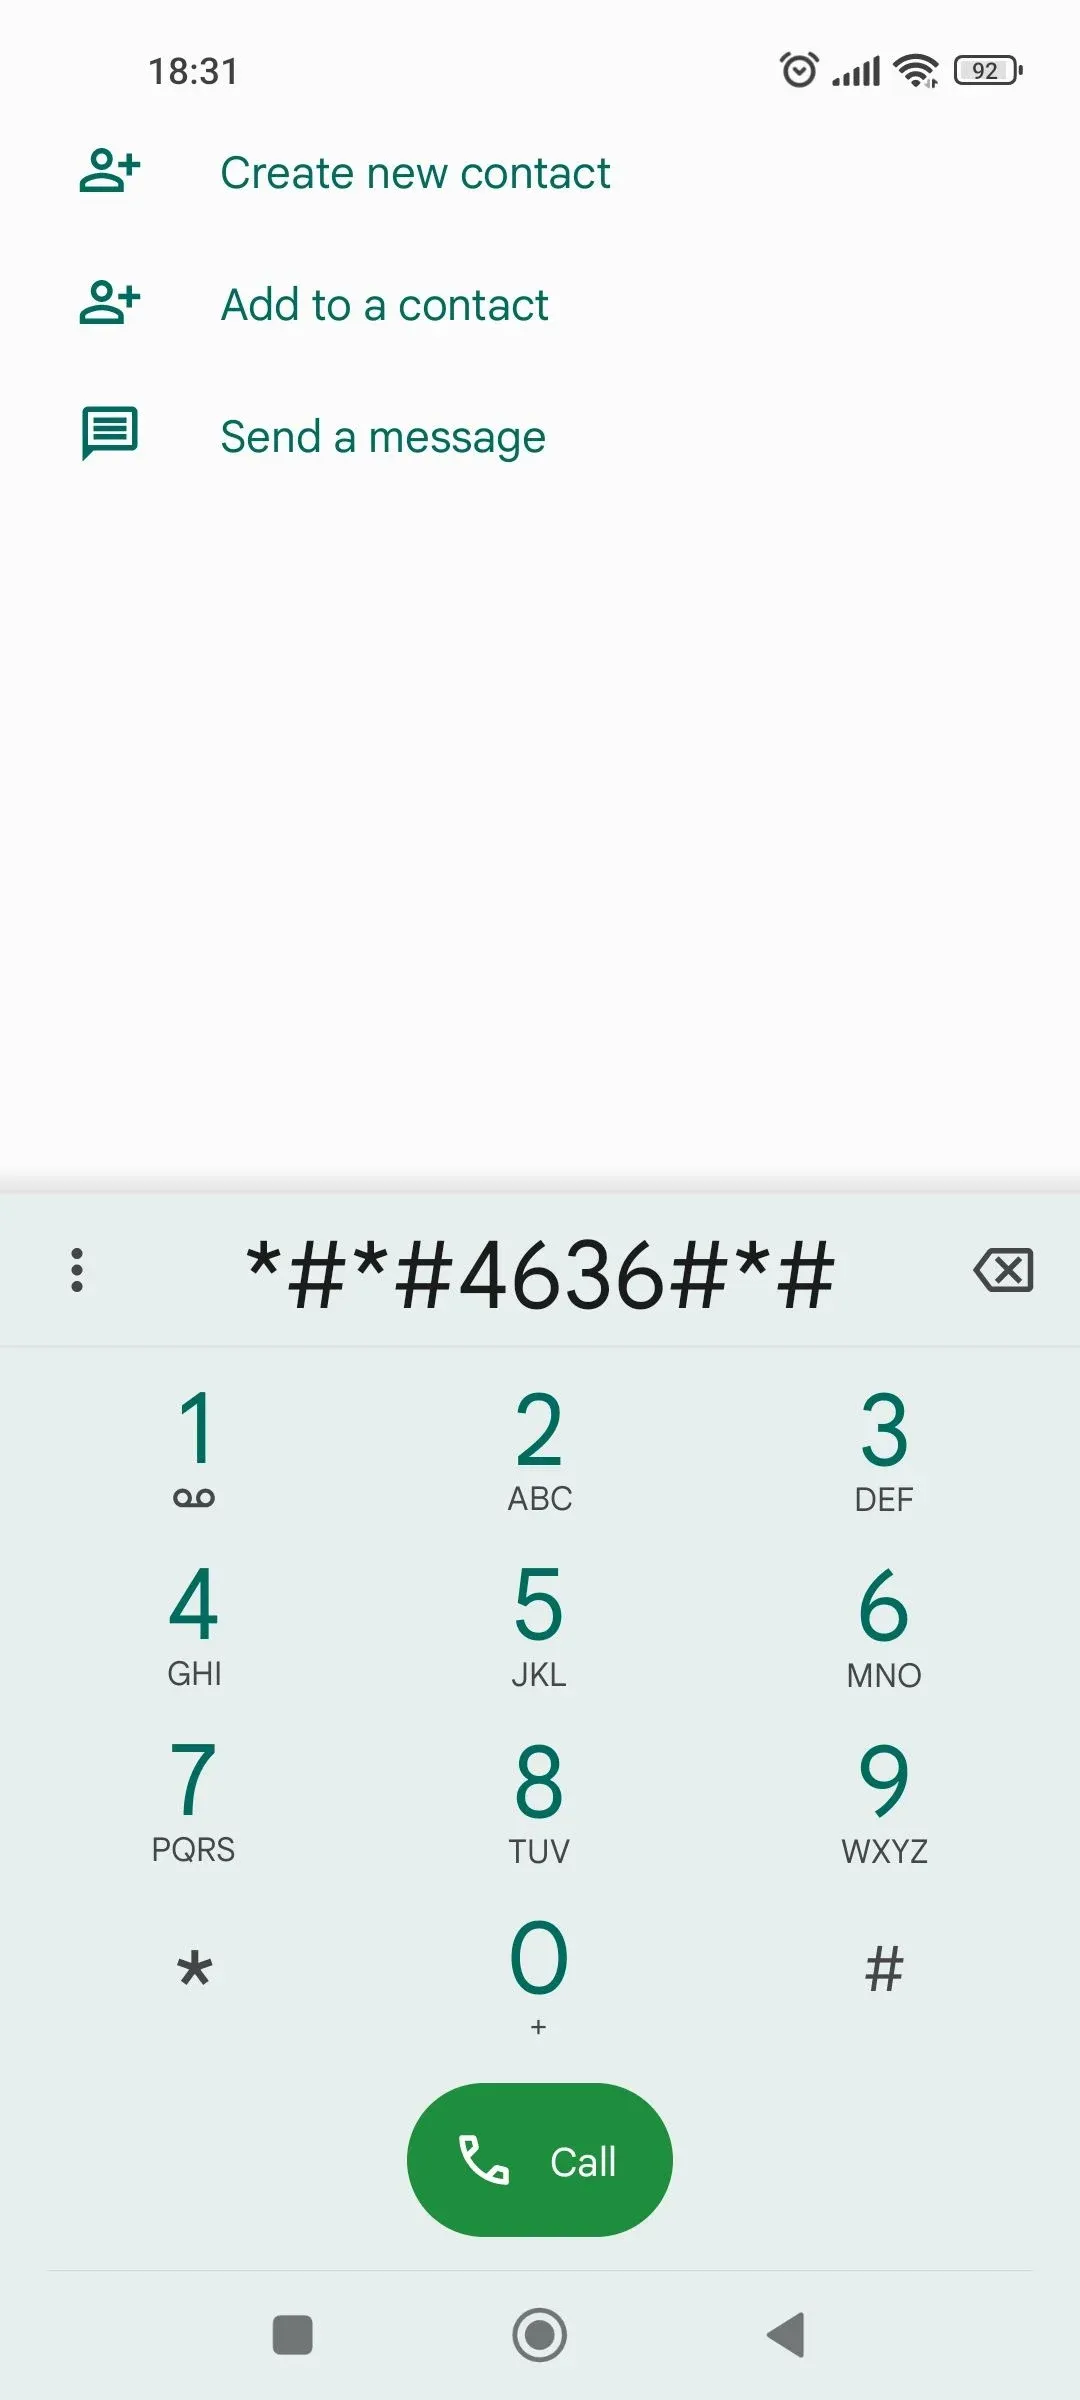
Method 4: Access Service Mode
This method requires you to open up the dialer first, afterward which the below steps are to be followed.
- Enter the lawmaking *#*#4636#*#* in the dialer
- Enter Service mode
- Click on the top selection – Device information or Phone data.
- Next, tap on the Run Ping exam.
- The radio pick will exist visible at the lesser of this screen.
- Cheque if information technology is off or on. Please printing the button side by side to it to turn on the radio.
- You volition be prompted to reboot the device.
- Click reboot, and your phone will beginning rebooting. Once completed, check if the problem is gone.
Method 5: Gear up Decadent ESN
- Plow your device on and get to the dialer to enter the code (*#06#), which shows upwardly the IMEI number of the device. If it shows 'Zilch,' the IMEI number is corrupt.
- Dial (*#197328640#) or (*#*#197328640#*#*) from the telephone dialer. Users are required to select the choice 'Common.'
- Side by side, select option #1, Field Test Mode (FTM). It should be OFF.' This procedure will restore the IMEI number.
- Render to the key input and select choice 2, which will plow off FTM.
- Now, remove the SIM card from the device and wait for 2 minutes to re-insert the SIM card.
- Plough on the device and type (*#197328640#) again from the phone dial.
- Next, get to and select Debug screen > telephone command > Nas control > RRC > RRC revision .
- Select Option v
- Restart your telephone
Method 6 - Update APN Settings
Update your APN Settings. Nether Wireless and Networks or Connectedness
- Navigate to Settings
- Tap Connections
- Tap Mobile Networks
- Select Access Point Names
- Tap More than (3 dots)
- Tap Reset to Default
- And so enter new APN Settings
View the Updated APN Settings For AT&T, Verizon, T-Mobile, Sprint ( +4 More)
If you are using T-Mobile, enter the following:
- Name: T-Mobile
- APN: Fast.t-mobile.com (for LTE devices) or epc.tmobile.com (for non-LTE devices)
- Proxy: <Non set>
- Port: <Not prepare>
- Username: <Non set>
- Password: <Non gear up>
- Server: <Non set>
- MMSC: http://mms.msg.eng.t-mobile.com/mms/wapenc
- MMS proxy: <Not set>
- MMS port: <Non set>
- MMS protocol: WAP 2.0
- MCC: 310
- MNC: 260
- Authentication Type: <Not set>
- APN Type: default,supl,mms OR Internet+MMS
- Default Android provides a text field to enter: default,supl,mms.
- Samsung provides an Internet+MMS radio button to select.
- APN Protocol: IPv4/IPv6
- APN roaming protocol: IPv4/IPv6 or IPv4 only when roaming internationally
- Plough APN on/off: Grayed out unless there are multiple APNs
- Bearer: Unspecified
If yous are using AT&T, enter the following:
- Name: NXTGENPHONE
- APN: NXTGENPHONE
- Proxy: not prepare
- Port: not set
- Username: not set up
- Password: non set
- Server: not set
- MMSC: http://mmsc.mobile.att.cyberspace
- MMS proxy: proxy.mobile.att.net
- MMS port: 80
- MCC: 310
- MNC: 410
- Authentication type: None
- APN type: default,mms,supl,hipri
- APN Protocol: IPv4/IPv6
- Bearer: Unspecified
OR
- Proper noun: AT&TAPN: wap.cingular
Proxy: <get out in="" blank="">
Port: <go out in="" blank="">
Username: wap@cingulargprs. com
Password: cingular1
Server: <exit in="" blank="">
MMSC: http://mmsc.cingular. com
MMS proxy: wireless.cingular. com
MMS port: 80
MCC: 310
MNC: 410
Hallmark blazon: <get out in="" blank="">
APN type: default,supl,mms OR Internet
APN Protocol: Exit it on the Default one
If you are using Verizon, enter the following:
- Proper noun : Verizon
- APN : vzwinternet (0r) net
- Proxy : <Not set>
- Port : <Not set>
- Username : <Not set>
- Password : <Non set>
- Server : <Not fix>
- MMSC : http://mms.vtext.com/servlets/mms
- MMS Proxy : <Not set>
- MMS Port : 80
- MCC : 310
- MNC : 012
- Authentication Type : <Non ready>
- APN type : default,supl,mms (or – for some phones) Interne + mms
- APN protocol: Ipv4
- APN roaming protocol: Ipv4
- Enable/disable APN: APN Enabled
- Bearer: Unspecified
- MVNO type : None
- MVNO Value : <Not ready>
Verizon APN Settings on iPhone
- Cellular Data
- APN: vzwinternet
- Username: <Exit in Blank>
- Countersign: <Leave in Blank>
- LTE Setup(Optional):
- APN: <Get out in Blank>
- Username: <Go out in Bare>
- Password: <Leave in Blank>
- MMS:
- APN: vzwinternet
- Username: <Leave in Blank>
- Password: <Go out in Blank>
- MMSC: http://mms.vtext.com/servlets/mms
- MMS Proxy: <Leave in Blank>
- MMS Message Size: 1048576
- MMS UA Prof URL: <Get out in Blank>
Method 7 - Select Network Operator
Get to Settings on your phone,
- Go to Wireless & Networks Or Connections
- Select Mobile Networks
- Select Network Operators
- Tap on Search At present
- So, Select your network.
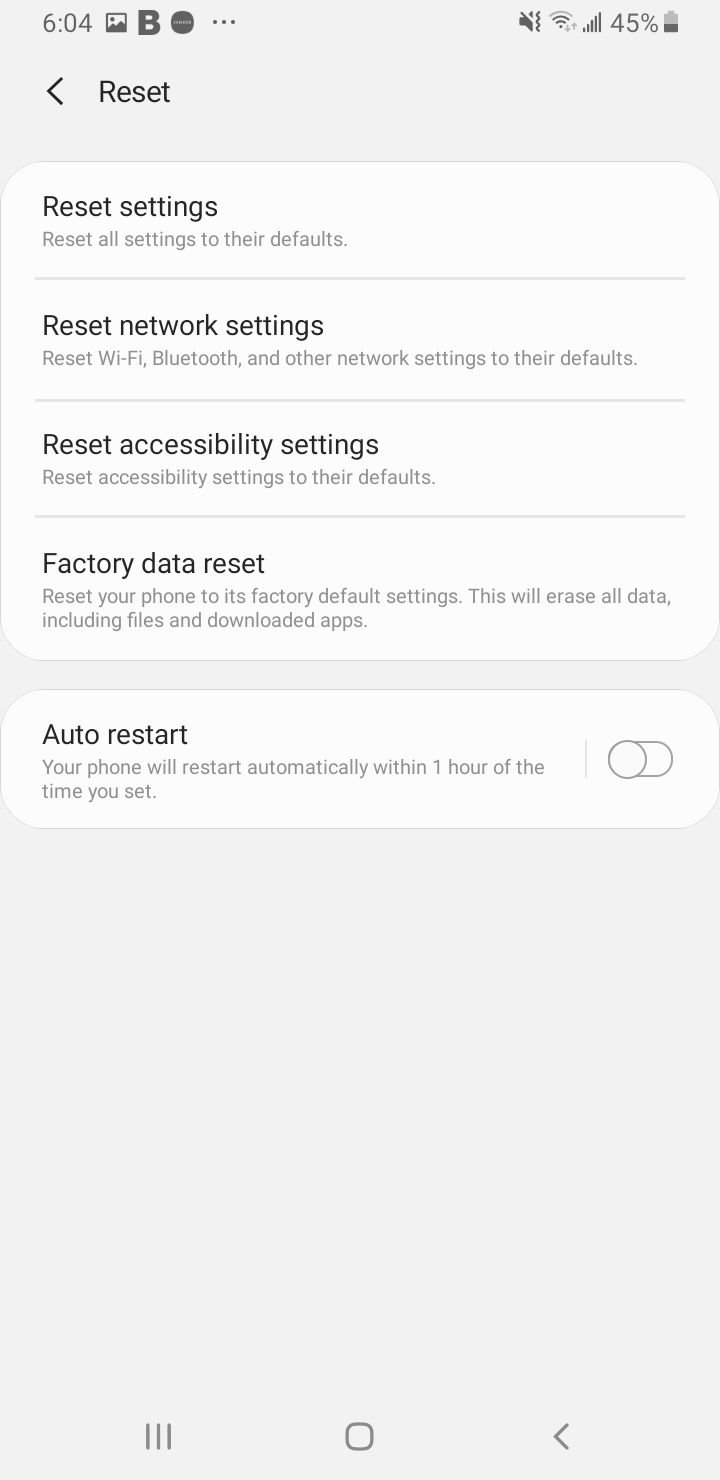
Method viii - Reset Network Settings
Sometimes only a simple network reset tin fix the consequence. From your phone home screen, select settings :
- Tap General Management
- Select Reset
- Tap Reset Settings
- Select Reset network settings
What happens when you reset your network?
When you reset network settings, a number of features are restored to default. These include Wi-Fi®, mobile information and Bluetooth®
- Turns on Wi-Fi®.
- Clears mobile data limits.
- Deletes all Wi-Fi® SSIDs.
- Sets preferred mobile network type to the best bachelor.
- Disconnects all tethered interfaces.
- Turns on mobile data.
- Turns off data roaming.
- Removes all app data restrictions.
- Sets network choice mode to automatic.
- Turns off Airplane mode.
- Turns off Bluetooth®.
- Turns off mobile hotspot.
- Forgets paired devices.
- Turns off VPN.
- Allows groundwork data sync.
Method 9 - Mobile Network Not Available
Not registered on the network may as well occur because the SIM card was non placed correctly, which may cause the "mobile network not available" and "mistake searching for network" errors. The solution below is for older Samsung models with a removable battery
- Go to Mobile network settings from Settings.
- When you are in mobile settings, hold the power button and home button together until your device turns off.
- While your Galaxy is off, gently remove the battery.
- Press the home push and ability button together for 10 seconds.
- Then, press and concord the power and dwelling house buttons for 1-ii mins – this will drain all static charges.
- Insert your battery now.
- Boot up your Samsung milky way with the SIM Card.
- Do non attach the dorsum embrace however.
- While your phone is on, remove then insert the SIM card three times. (On some android phones, yous demand to remove the battery before taking out the sim carte. If this is this outcome, please skip this step)
- You will be prompted to restart your phone.
- Restart your phone, and you will no longer see an error while searching for a network.
NB: If you striking the update from settings, and it says "NO FIRMWARE FOUND," yous have to update via Kies on your computer.
Method 10 - Other workarounds worth trying
- Toggle Wifi and Airplane Mode -> Turn off Wi-Fi & Plane for 40 seconds and plough it on back.
- Effort a unlike SIM Card.
- Modify to a different Network Way - > Navigate to Settings > Connections > Mobile Networks > Select Network Modes > Cull Your Preffered Network Fashion ( Toggle between these - > 3G, 3G/2G or 4G/3G/2G)
- Contact your mobile carrier -> Permit them be aware of the issue, in well-nigh cases, they will send yous a new APN or perform an action on their path (Remotely)
- Perform a Mill Reset.
Other Solutions and Methods
- How To Fix Samsung Galaxy No Service
- How To Gear up No SIM Card Error
- How To Set up "MOBILE NETWORK Non Bachelor" Error In Android.
- If Your Android Phone Can't Make or Receive Calls

How To Register My Phone On Network,
Source: https://www.technobezz.com/fix-samsung-galaxy-registered-network/
Posted by: almonyeseadleive.blogspot.com
0 Response to "How To Register My Phone On Network"
Post a Comment